Thursday, October 27, 2011

Mummy Bars

by Laura

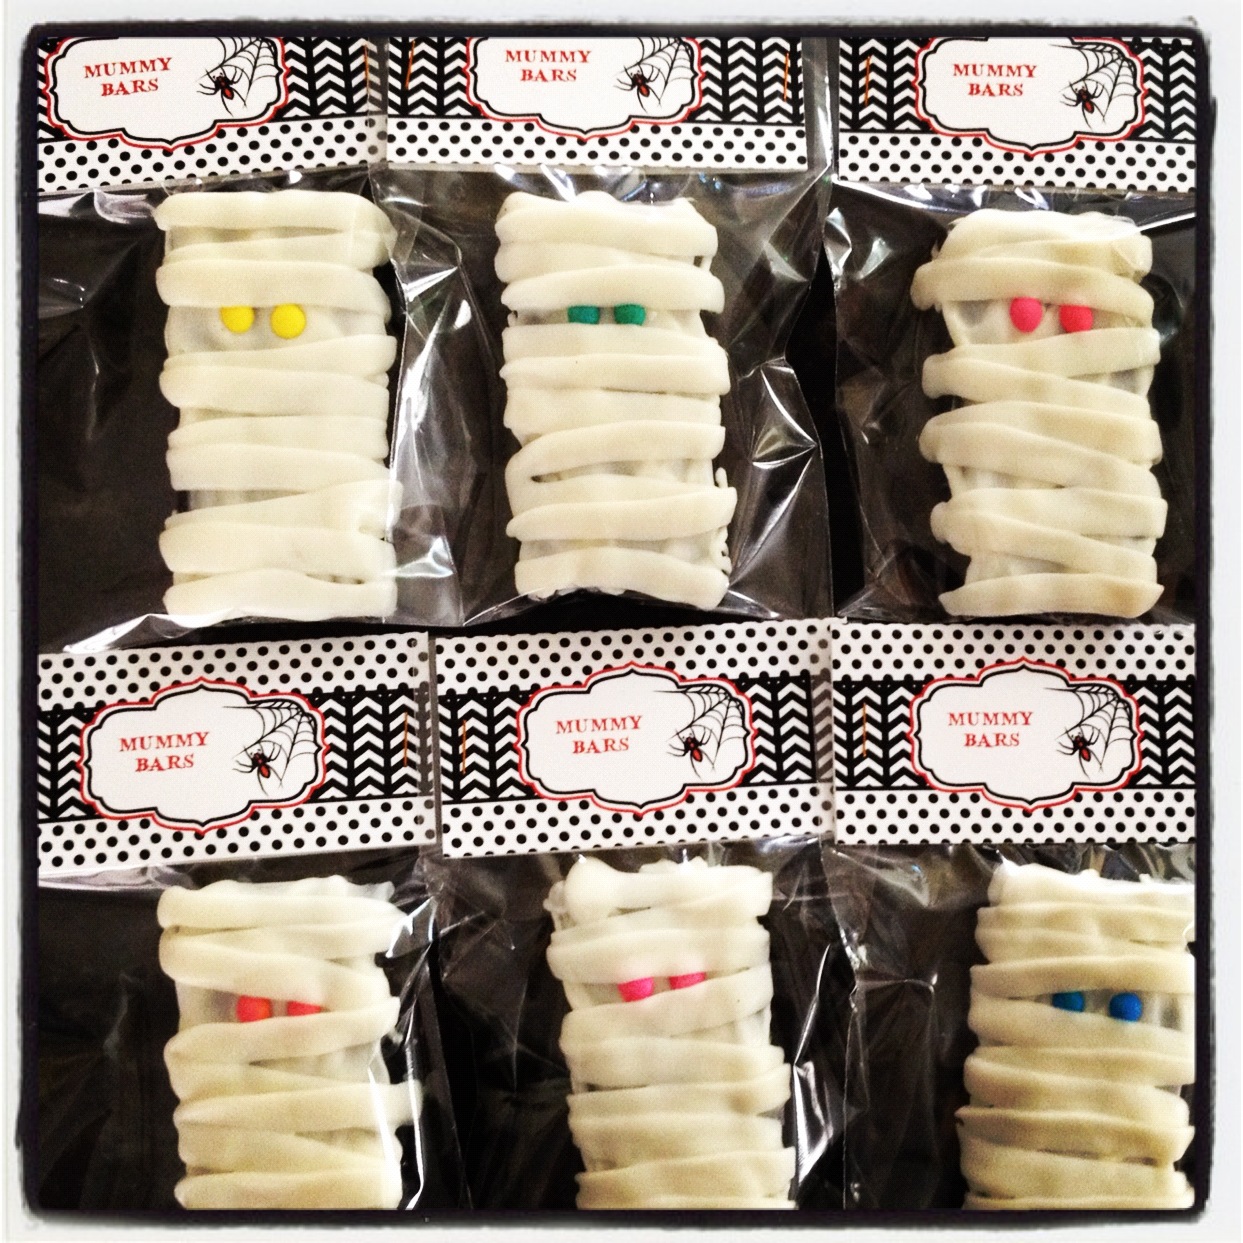
My friend Liz is incredibly creative, beautiful and smart and if that's not enough, she knows how to rock out every holiday, especially Halloween. She makes elaborate costumes for her family and really knows how to spook up easy simple treats that really put you in the mood and this year is no different. Her son is dressing up this year as a mummy and she has made some tasty, creative mummy bars to match. Here's what she did:


Liz took store-bought Oreo brownies they come ten to a box for about three dollars, then she melted white candy melts or almond bark. She put a thin layer over the almond bark over the top of the brownie to set a base for the mummy with a knife. She found some candy buttons they come on paper strips at your local craft store like Michael's and affixed them as eyes. Next she piped the melted white candy using Wilton tip #150 It's a flat one to really give the wrapped effect of a mummy. She let them set up in the fridge and then packaged them in 4" lollipop bags to give it that finished look.


These treats are really simple and fast but extremely festive- I wish I thought of it!

Thanks for sharing Liz!

Thursday, October 20, 2011

Roasting: A Cornish Game Hen

This week I took a cooking class through one of my local cooking stores. It was so fun and I learned a lot of basic techniques, that I had a lot of misconceptions about. When the class was over, we got to take home a Cornish game hen to practice our skills.

I did a quick chiffonade on some basil, let some butter soften, but a dash of salt and pepper and mixed it to create an herb butter. Then use used my finger and released the membrane of the Cornish game hen skin and put the butter under the skin, being sure to get some on the leg butter. Then rub, rub, rub.


I then seasoned the bird liberally with salt and pepper...squeezed a quarter of a lime over the top and then threw the lemon into the cavity of the bird.

Put in the oven at 450 degress for 30-35 minutes and...

Voila!


The skin on the Cornish game hen was crispy and tasty. The meat was moist, juicy, and ohhhh so flavorful! 


...turns out I can roast poultry like a pro!

Tuesday, October 11, 2011

The Basics: Chicken Stock

I have been wanting to make my own chicken stock like Ina for a long time, unfortunately it's hard to set aside hours and hours to stirring and skimming over a stock pot. So, I turned to my slow cooker!

I grabbed some vegetables...a bunch of celery, 1½ onions quartered, some carrots,
sprigs of thyme, a bunch of sage, and a bit of rosemary
.
First, I layered the slow cooker with onion, 4 celery stalks roughly chopped (with leaves). Then, smashed a few garlic cloves and threw those in. 
Next, I grabbed a leftover rotisserie chicken with quite a bit of meat left on it. I placed the chicken carcass on the veggies and then added in a bit of thyme, sage, and rosemary. Finally, I cracked some pepper and a bit of kosher salt over the chicken. (wish I could have just done whole peppercorns.)


I added water until the crock was about ¾ full. and cover. 


Put your slow cooker on high for 4 hours and then lowered it down to the low setting for 6 hours. (Then, I did whatever I wanted.) I let it cool for about twenty minutes and I put it through a strainer.  Once I discarded the vegetables and bones...and skimmed off a bit of the fat, I put it into some quart paper cartons. I refrigerated it until cold, skimmed off more fat and put it in the freezer to be used in something tasty!

Don't be afraid to taste it at the end and season as appropriate! I would suggest doing less salt so you can add it in your recipe when you eventually use it. 

Stay tuned to see how I use the stock. 

Monday, October 10, 2011

Williams Sonoma Pumpkin Dessert Squares Redux

Wonder what you can do with Pecan Pumpkin Butter and a yellow box cake?

 You may remember the bars I made a few years ago. (Please, please, please ignore my horrible photo!) This time, I decided to do something a bit more individual, Pumpkin Dessert "cupcakes."

Preheat oven to 350 degrees
Ingredients:
  • 1 box yellow cake mix
  • 1 Jar Muirhead Pumpkin Pecan Butter
  • 3 eggs
  • 1 Tablespoon of flour
  • 1/4 cup of sugar
  • 3/4 cup of unsalted butter
  • 3 Tablespoons of milk
  • 1 teaspoon cinnamon

First, Reserve 1 cup of the cake mix and set aside

Second, mix remaining cake mix with 1/2 cup of melted butter and 1 egg. Divide the mixture evenly and press mixture lightly into the bottom of a each part of the muffin tin.


Mix 1 jar of Muirhead Pumpkin Pecan Butter with 2 large eggs 
and 3 tablespoons of milk and pour over cake mixture in pan.


Mix reserved cake mix with 1 Tablespoon of flour, 1.4 cup of sugar, 
1/4 cup of soft butter and 1 teaspoon of cinnamon.

Crumble over the top of the pumpkin layer.

Bake 20 minutes or until golden. (I rotate at 8 mins)


 Cool muffin tin and cooling rack and carefully remove. 


Yum.

Adapted from Williams-Sonoma recipes

Sunday, October 9, 2011

Pumpkin Pancakes


Remember how I looooovvvveee pancakes?!? Well, as the fall starts rolling in, I start craving pumpkin pancakes. So, I decided to hack my favorite pancake recipe, and create...

Emily's Ultimate Pumpkin Pancakes 
Ingredients

  • 2 c. buttermilk
  • 2 eggs
  • 1/2 cup pumpkin puree (not pumpkin pie filling)
  • 1/4 c. canola oil
  • 1 tsp. baking soda
  • 1 tbsp. sugar
  • 1 tsp. salt (if you're using sea salt, cut the amount in 1/2)
  • 1 1/2 c. flour (no need to level it) 
  • 1/2 teaspoon of cinnamon
  • 1/8 of a teaspoon each of nutmeg, cloves, and ginger. 

    Directions
    1. Heat non-stick griddle to medium-high heat.
    2. Mix buttermilk, eggs, oil,  baking soda, sugar, pumpkin puree, cinnamon, nutmeg, cloves, ginger, and salt together.
    3. Add flour gradually. Mix until only a little lumpy. (How easy is that?!)*
    4. Ladle or pour batter onto griddle to form whatever size pancake you like. 
    5. Cook until bubbles break the surface of the pancakes and the underside is golden brown. 
    6. FLIP!
    7. Cook other side until golden brown. (Time varies on size of pancake.)

    Then pour over the perfect syrup!

    Buttermilk Syrup
    Ingredients
    • 1 c. butter
    • 1 c. buttermilk
    • 2 c. sugar
    • 2 tsp. Karo syrup
    • 2 tsp. vanilla
    • 1 tsp. baking soda
    Directions
    1. Mix butter, buttermilk, sugar, and Karo syrup. Boil 5 minutes, whisking occasionally. 
    2. Remove from heat and add vanilla and baking soda. 


    Pair that with some crispy bacon and you've got my favorite fall breakfast! 

    Thursday, October 6, 2011

    Makin' Moqueca

    A few weeks ago, a friend and I decided to try our hand at making a delicious Brazilian dish called moqueca. He had recently been living in Boston, which has a high Portuguese/Brazilian population. One night, a group of Portuguese women took him out for a bowl of moqueca. He loved it so much...we decided to give it a shot at home!


    We chopped for like...ever

    Started sweating the onions...

    Threw on the bell peppers...

    After layering tomatoes, bell peppers, and almost an entire bunch of chopped cilantro...
    we placed the a few cod filets.


    Then we covered it. (How cute is my new Staub?!)

    After the cod was cooked almost through, we added a bit of coconut milk.  
    Then we added some butterflied shrimp to the mix...

    With a slice of lemon, it hit a mound of basmati rice!

    The verdict: This was a really fresh dish and definitely had a lot of hearty ingredients...however, I have to admit that our recipe lacked the bit of kick I was really hoping for. My compadre and I decided a few ways we'd combat this the next time: 1) It needed heat. Next time, we would definitely add a spicy element, whether that be some hot sauce, chile pepper puree like Emeril Lagasse's recipe, or perhaps throwing in some chopped jalapeños in the last few steps.; and 2) It could have used a finish salt, making like some Maldon sea salt or grey sea salt.

    Wednesday, October 5, 2011

    Chicken Pot Pie

    I  adore chicken pot pies. There rich creamy texture and hearty flavors instantly warm me and bring me back to my childhood. Halfway through this long, rainy week...that is exactly what I needed. So, remember how I made my first apple pie last week? Well, I had some of my crust left over in my freezer. With the weather turning cooler, my dough was crying out to cover a chicken pot pie. Today...the crying stopped.


    My chicken pot pie!


    adapted from Ina Garten's Chicken Pot Pie
    2 hearty servings

    Ingredients
    • 1/2 cup cubed chicken breast from rotisserie chicken
    • Kosher salt
    • Freshly ground black pepper
    • 2 1/2 cups chicken stock, preferably homemade
    • 1 chicken bouillon cubes
    • 3/4 vegetable spread
    • 1 cups yellow onions, chopped
    • 1/4 cup all-purpose flour
    • 1/4 cup whole milk
    • 1 cups medium-diced carrots, blanched for 2 minutes
    • 1 cup  frozen peas
    • 1/2 cup celery
    • 1/2 cup minced fresh sage, thyme
    I peeled, chopped, and minced

    For the pastry: My leftover pie dough

    Directions
    1. In a small saucepan, heat the chicken stock and dissolve the bouillon cubes in the stock. In a large pot or Dutch oven, melt the butter and saute the onions over medium-low heat for 10 to 15 minutes, until translucent. 
    2. Add the flour and cook over low heat, stirring constantly, for 2 minutes. Add the hot chicken stock to the sauce. Simmer over low heat for 1 more minute, stirring, until thick. 
    3. Add 2 teaspoons salt, 1/2 teaspoon pepper, and milk. Add the cubed chicken, carrots, peas, celery and parsley. (I added sage and thyme, as well) Mix well.
    4. Preheat the oven to 375 degrees F.
    5. Divide the filling equally among 2 ovenproof bowls. Divide the dough into quarters and roll each piece into an 8-inch circle. 
    6. Brush the outside edges of each bowl with the egg wash, then place the dough on top. Trim the circle to 1/2-inch larger than the top of the bowl. 
    7. Crimp the dough to fold over the side, pressing it to make it stick. Brush the dough with egg wash and make 3 slits in the top. 
    8. Sprinkle with sea salt and cracked pepper. Place on a baking sheet and bake for 1 hour, or until the top is golden brown and the filling is bubbling hot. (I found 45 minutes did the trick for me...remember every oven/altitude can be different!)
    Into the oven it went!


    It come out so golden and piping hot...I admit I was so excited that I burned the roof of my mouth in all the excitement. It was perfectly warm and hearty...everything a chicken pot pie should be!

      Tuesday, October 4, 2011

      It's National Taco Day!

      When I was younger, I used to think I hated tacos. It's mostly because I thought they only came in one variety: the hard-shelled, sometimes soggy ground "beef" Taco Bell tacos. Thank goodness I have expanded my horizons and realized that tacos are one of the most accessible vehicles to get creative. From Boom Noodle's ahi tuna tacos here in Seattle to LA's Kogi Truck's Korean short-rib tacos...these tasty little bites are some of my favorite late night snacks!


      Here are my suggestions:
      Here are some for free:
      For those of you who want to stay in tonight, try this tasty Chile-Braised Pork Shoulder Tacos from Bon Appetit!
        Related Posts with Thumbnails